LogoLogo
  • 👋GETTING STARTED
    • What is AlgoBox™?
    • 2-Week Free Trial
    • System Setup
    • How To Install
    • How To Use GitBook Documentation
    • AlgoBox™ Beginners Course
  • 🔵FUNDAMENTALS
    • 120 Day Program
    • Workspaces
    • Chart Layouts
    • AlgoBars
    • Contract Rollover
    • Trading Sessions
    • Time Regions
    • News
    • Trade Tracker
    • Daily Tracker Sheet
    • Tide / Wave Visualizer
    • Position Sizing
    • Position Manager
    • Position Details
    • Button Panel
    • Bid Ask Lines
    • Channel Regulator
    • Chart Labeler
    • Current Day OHL
    • Golden Ropes
    • MACV Filter Chart
    • MACV ULTIMATE
    • No Fiddle Zone
    • SMLK Timing Lines
    • FibElliDott
    • Harmonic Patterns
    • FlowMaster™ Alpha Omega
    • FlowMaster™ AudioBox
    • FlowMaster™ Cross
    • FlowMaster™ Delta Flagging Pro
    • FlowMaster™ Enigma
    • FlowMaster™ Enigma Bot
    • FlowMaster™ Enigma Dream Panel
    • Info Panel
    • Speedometer & Psychology Module
    • Speedy Chart
    • Support & Resistance Zones
    • Ultimate OBOS Divergence
    • Volume Profiler
    • Chart Notes
  • 🟢STRATEGIES
    • 1 Tick Wonder
    • 2 Finger Salute
    • 3 Wise Men
    • 4 Legged Dog Trap
    • Super Bands
    • Cluster Reversal
    • DCDM
    • DCR
    • Delta King
    • Diamond Dot
    • Double Delta
    • Double Delta Shift Reversal
    • Double Dot
    • HarmoniDot
    • Headshot
    • Ignition Bar
    • J-Hook
    • Masher
    • Enigma + AudioBox
    • Enigma MoonShot
    • Enigma Cadence
    • Double Enigma
    • Enigma + DCDM
    • Piercer
    • Plover
    • PRZ Cross
    • P-PRZ Ladders
    • Richie
    • Shark Back & Shark Tail
    • Strategy Confluence
    • Turtle
    • Regions
    • Alpha Omega Clustering
    • Alpha Omega Continuation
    • Super Alpha Omega
    • Super Moon
    • Titanic Zone
  • 🔴ESSENTIAL TIPS & TECHNIQUES
    • 4 Types of Stop Losses
    • 2-Try Rule
    • Recency Is Key
    • Hold To Opposing Signal
    • Small Account Challenge
    • Practice 10x Size
    • Checklists & Reminders
    • Stalking Trades
    • Dr. Seuss Entry Technique
    • Windfall Rules
    • Tools Of The Trade
    • Screenshots & Recordings
    • Trade Copier
    • PC Performance
    • NinjaTrader 8
    • Hotkeys
    • Sound
    • Trade Performance
    • Indicators
    • Market Replay / NT Playback
    • Commissions
    • Daily Loss Limit
    • Multiple PCs
    • Discord
    • AlgoBox™ Academy
      • Answers
    • Discounts
  • 🔗Links
    • Website
    • YouTube
    • Discord
    • AlgoBoxGPT
    • ℹ️Disclaimer
Powered by GitBook
On this page
  • Position Manager Settings
  • 1. Hotkeys
  • 2. Visual Settings
  • 3. Data Series
  • 4. Setup
  • 5. Visuals
  • Example
  • Video Tutorial: Position Manager
  • Video Tutorial: Hot Keys
Export as PDF
  1. FUNDAMENTALS

Position Manager

Fast Position Management

Last updated 4 hours ago

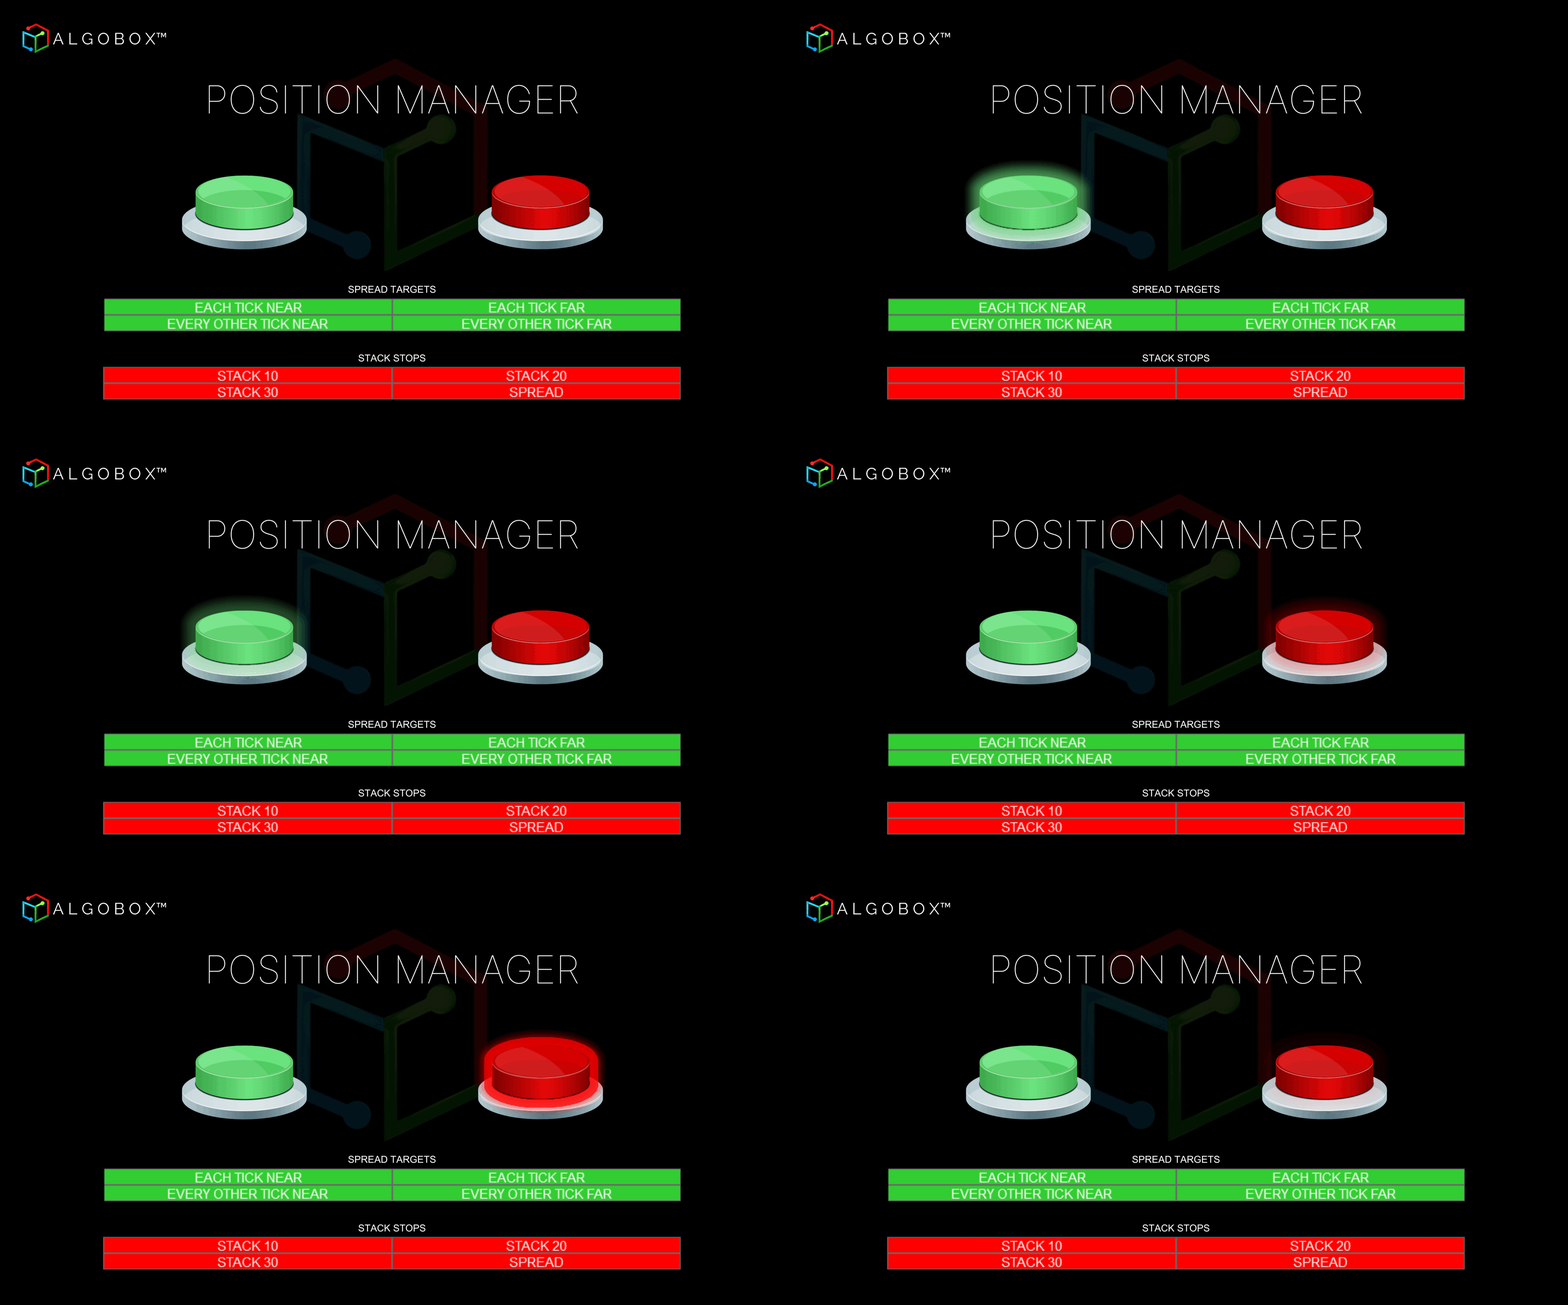
The AlgoBox™ Position Manager is included in the suite of AlgoBox™ professional trading tools. You can add the Position Manager to any chart of your choice. It enables quick management of stop losses and targets with a single click. You no longer have to painstakingly click and drag each individual target and stop loss on the chart, which can make your trading easier, especially in fast moving markets.

Remember: The STACK 10, 20 and 30 buttons set the stops relative to the market's current price.

  1. EACH TICK NEAR (ETN): This button will automatically set targets 1 tick apart, starting with the closest target to the current price.

  2. Clicking STACK 10 sets all stop losses for that instrument to 10 ticks away from the current price. Note that if the price moves while placing multiple orders, stop losses may be set at slightly different levels.

  1. EVERY OTHER TICK NEAR: This button will automatically set all of your targets two ticks apart from each other, starting at the price of your target which is currently closest to market price.

  2. To set all stop losses to 20 ticks away from current price, use STACK 20. Be aware that if the market is volatile during order placement, stop losses may have slight variations.

  1. Click EACH TICK FAR to automatically set targets 1 tick apart, starting from the target furthest away from the current price.

  2. STACK 30 sets all stop losses for the instrument to 30 ticks away from the current price. Market fluctuations during order placement can slightly vary the stop loss levels.

  1. EVERY OTHER TICK FAR: This button will automatically set all of your targets 2 ticks apart from each other, starting at the price of your target which currently farthest from market price.

  2. Clicking on the SPREAD button will spread out all of your stop losses evenly. You can group your stops back together again by clicking on any of the other STACK buttons.


Position Manager Settings

1. Hotkeys

Customize your hotkeys to fit your needs. You can assign keys on your keyboard for the functions Stack 30, Each Tick Far, and Every Other Tick, and easily modify them to your preferred settings.

2. Visual Settings

Allows you to customize button colors, adjust the button placement, and modify the font and size to suit your preferences.

Button Position: Adjusts the placement of buttons on the chart, allowing for a personalized layout and accessibility.

Text Color: Changes the color of the text displayed on the buttons.

Target Button Color: Sets the color of the button used for target settings.

Stop Button Color: Defines the color of the button associated with adding stops for the stop functions.

Button Font: Modifies the font style and size of the text on the buttons, enhancing visual appeal and legibility based on user preferences.

3. Data Series

Displays the current chart instrument, contract date and configurations applied.

Input Series: This setting determines which chart the indicator is displayed on, linking the indicator to the selected chart data.

4. Setup

Allows you to add a label, set the maximum bars to look back, and configure calculations based On Price Change, On Bar Close, or On Each Tick.

On Price Change: Updates the indicator only when there is a change in the instrument's price.

On Bar Close: Updates whenever a new bar closes, recalculating based on the finalized bar data to reflect the latest market conditions and changes in trends. Be mindful of whether you are using AlgoBars or range bars. This is the default setting for this indicator.

On Each Tick: Updates with every price change or tick in the market, providing real-time adjustments and reflecting the most current data. This is the most CPU intensive setting.

5. Visuals

Allows you to customize button colors, adjust the button placement, and modify the font type and size to suit your preferences. The Visual Settings shown are default settings which usually do not need to be changed unless specified in release notes or instructional video, live stream or on Discord etc. Auto scale is recommended to be unchecked.

Auto Scale: Automatically adjusts the indicator’s scale to fit within the chart’s price axis, ensuring it’s properly visible without manual adjustments.

Displacement: Shifts the indicator's plot forward or backward on the time axis. This setting is useful for aligning the indicator with price bars or other chart elements, especially in cases where you want to visualize future or past data relative to the current price.

Display in Data Box: Determines whether the values are shown in the Data Box, which is an on-screen display that provides detailed information about the current values when you hover over or click on the chart.

Panel: Specifies which panel or sub-panel the indicator is displayed in on the chart. Indicators can be placed in separate panels above or below the main price chart, allowing for organized and uncluttered visualization of multiple indicators.

Price Markers: Controls the display of markers or symbols on the price axis associated with the indicator's values. This setting helps highlight specific price levels or events directly on the price chart for better visibility and analysis.

Scale Justification: Determines where the indicator is positioned on the price scale, such as to the right or left side of the chart.

Visible: Toggles the overall visibility of the indicator, allowing you to hide or show it on the chart as needed.

All settings displayed in the settings image are the current default configurations provided by NinjaTrader and/or the AlgoBox™ Pro software, and may change at any time in future software updates without notice.


Example


Video Tutorial: Position Manager

Video Tutorial: Hot Keys


Continue to:

Only available on AlgoBox™ for NinjaTrader 8.

🔵
Position Details
Try AlgoBox™ for free today.
Disclaimer
AlgoBox™ Position Manager features intuitive and strategically designed buttons, providing you with seamless and easy accessibility to quickly manage your stops and targets mid-trade.
Here's an example of Each Tick Near button (1) to set targets and Stack 10 to set Stops (2).
Here's a sample trading chart showing targets set to Each Tick Near and stops set to Stack 10.
Here's an example of Every Other Tick Near button (1) to set targets and Stack 20 to set Stops (2).
An example of a live trading chart showing targets set to Every Other Tick Near and stops set to Stack 20.
Here's an example of Each Tick Far button (1) to set targets and Stack 30 to set Stops (2).
An example of a live trading chart showing targets set to Each Tick Far and stops set to Stack 30.
Here's an example of Every Other Tick Far button (1) to set targets and Spread to set Stops (2).
An example of a live trading chart showing targets set to Every Other Tick Far and stops set to Spread.
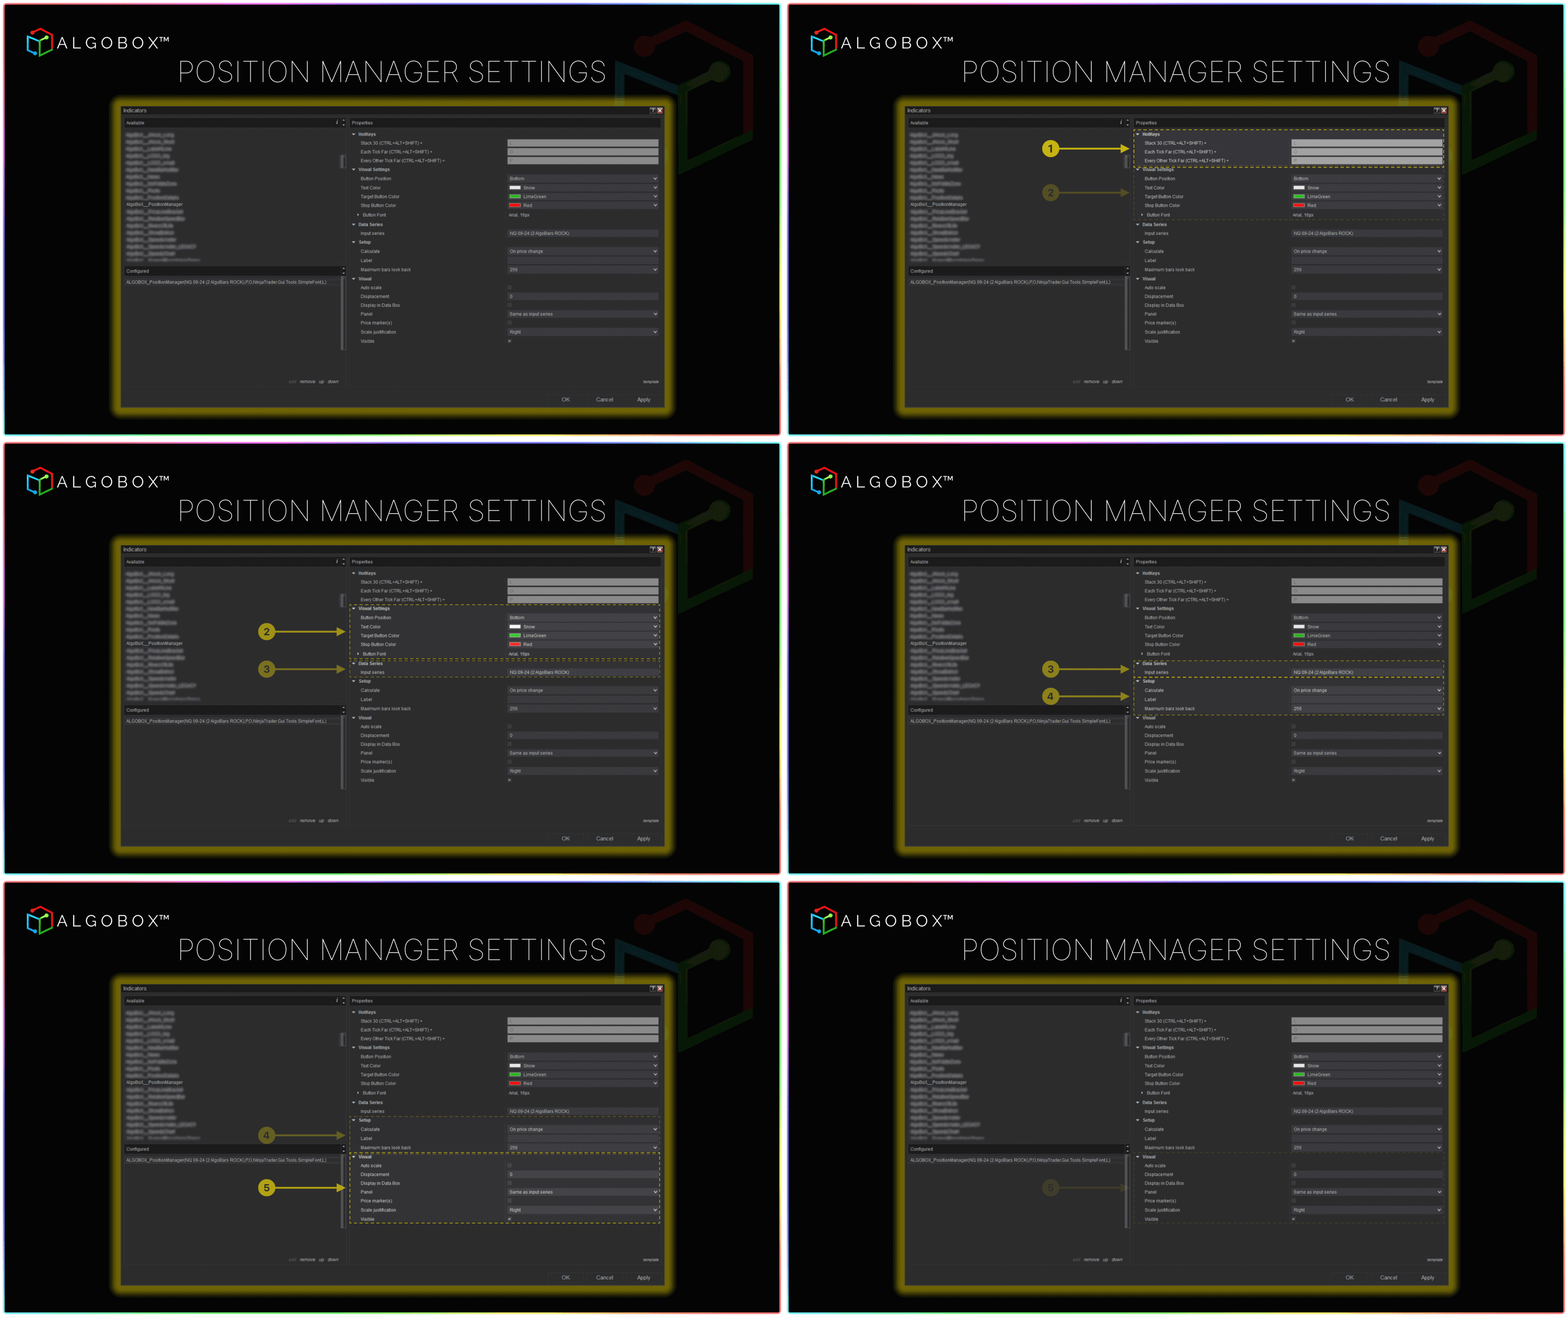
The Position Manager offers a variety of customizable settings, allowing you to adjust them according to your preferences. Default AlgoBox™ settings are shown.
Watch: The Position Manager buttons in action, toggling the 'Every Tick Near' and 'Stack 10' functions.
WATCH: A short clip explaining the functions of the AlgoBox™ Position Manager.
WATCH: Vinny E. Mini reveals the hot key functions for the Button Panel and more in this short compilation.